
Skip to content
Kalever
  • How We Work
  • The Platform
  • Why Kalever
  • Resources
    • Articles
    • Product Decks
    • Case Studies
  • Contact
Kalever
  • How We Work
  • The Platform
  • Why Kalever
  • Resources
    • Articles
    • Product Decks
    • Case Studies
  • Contact

Getting Started

4
  • Your Home Dashboard: Overview
  • Account and Notification Settings
  • Create a New Project
  • Navigating the Project Dashboard

Pricing tool

2
  • How to Create a New Quote
  • How to Download, Edit, and Duplicate Quotes

Survey Creator

8
  • How to Create a New Survey
  • Classic Editor: Control Area
  • Classic Editor: Overview
  • Classic Editor: Adding and Editing Survey Elements
  • Classic Editor: Using Custom Modules
  • Decipher Editor: Editing Your Survey
  • Dimensions Editor: Editing Your Survey
  • AI Assistant

TrackEntry Tool

4
  • Introduction to TrackEntry: Access and Overview
  • How to Create, Edit, and Manage Entries
  • Using Live Chat for Real-Time Communication
  • How to Integrate TrackEntry with a Decipher Survey

Codebooks Tool

2
  • Creating a Codebook for Open-Ended Data
  • How to Edit and Manage Your Codebook

Best Practices: A Project Lifecycle Guide

8
  • The Bidding Stage: Creating a Winning Quote
  • Phase 1: The Bidding Stage: Creating a Winning Quote
  • Phase 2: Project Kick-Off: Setting Up for Success
  • Phase 3: Questionnaire Design — From Idea to Final Draft
  • Phase 4: Initial Survey Programming: A Seamless Handoff
  • Phase 5: QA – Efficient and Traceable Survey Testing
  • Phase 6: Managing Client Feedback and Changes
  • Phase 7: Data Checks — Ensuring Data Quality

ResearchReady

4
  • Introduction to ResearchReady
  • Accessing ResearchReady
  • Running an Analysis within ResearchReady tool
  • Reviewing Results

QAReady

4
  • Introduction to QAReady
  • Accessing QAReady
  • Running a check with QAReady
  • Reviewing the Results
View Categories
  • Home
  • Knowledge Base
  • QAReady
  • Running a check with QAReady

Running a check with QAReady

A new QAReady evaluation can be started in two ways

1. From an Existing Project
Open the QAReady tool and select + New QAReady Check in the upper-left corner.

2. From the Home Dashboard
Select the Check with QAReady module to start a QA review directly.

A popup window will open where you can provide all information required for the QA check.
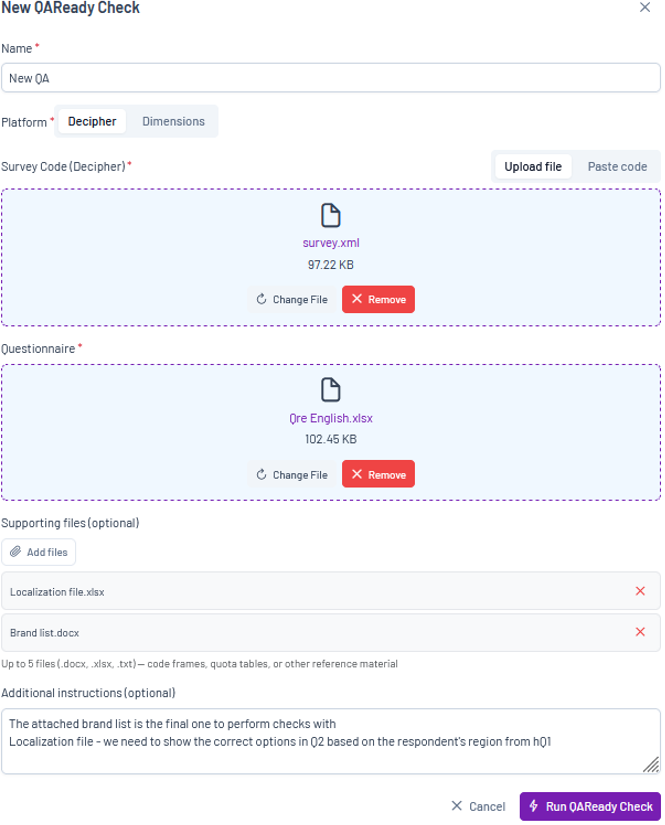
Name – Enter a name for the QAReady check.

Platform – Select the survey platform used for your project.

Survey Code – there are two ways to provide survey code:

  • Upload file: Upload an exported code file. Depending on the platform, this may be an .xml or .mdd
  • Paste code: Paste the survey code directly into the provided field.

Questionnaire – Upload the survey questionnaire. Both Word and Excel formats are supported.

Supporting Files (optional) – Upload any additional materials that may provide useful context for the review, such as:

  • Brand lists
  • Zip/postal code lists
  • Formula specifications
  • Quota tables
  • Other reference materials

Additional Instructions – Provide any additional guidance for the AI review. For example, you can:

  • Explain how specific materials should be interpreted
  • Highlight important project requirements
  • Provide context for supporting files
  • Add instructions that should be considered during the QA process

Once all required information has been provided, select Run QAReady Check to begin the evaluation. When processing is complete, the results report will be generated automatically.

Accessing QAReadyReviewing the Results

Share This Article :

  • Facebook
  • X
  • LinkedIn
  • Pinterest

Was it helpful ?

  • Happy
  • Normal
  • Sad
Contact form
Contact form
Linkedin

Copyright © 2026 Kalever | Powered by Kalever