Skip to content
Kalever
  • How We Work
  • The Platform
  • Why Kalever
  • Resources
    • Articles
    • Product Decks
    • Case Studies
  • Contact
Kalever
  • How We Work
  • The Platform
  • Why Kalever
  • Resources
    • Articles
    • Product Decks
    • Case Studies
  • Contact

Getting Started

4
  • Your Kalever Dashboard: An Overview
  • How to Create a New Project
  • Managing Notifications, Members, and Project Settings
  • Navigating the Project Dashboard

Pricing tool

2
  • How to Create a New Quote
  • How to Download, Edit, and Duplicate Quotes

Survey Creator

5
  • How to Start a New Survey
  • Editing Your Survey: A Guide to the Classic Editor
  • Advanced Options: Exports, Imports, and Version Control
  • A Deep Dive into Adding and Editing Survey Elements
  • Using Custom Modules for Advanced Exercises (MaxDiff, Conjoint, etc.)

TrackEntry Tool

4
  • Introduction to TrackEntry: Access and Overview
  • How to Create, Edit, and Manage Entries
  • Using Live Chat for Real-Time Communication
  • How to Integrate TrackEntry with a Decipher Survey

Codebooks Tool

2
  • Creating a Codebook for Open-Ended Data
  • How to Edit and Manage Your Codebook
View Categories
  • Home
  • Knowledge Base
  • Getting Started
  • How to Create a New Project

How to Create a New Project

Creating a new project in Kalever is your first step to organizing your research. This guide will walk you through the process.

Step 1: Open the New Project Window #

From your main Home Screen, click the + New Project button located in the top-left corner.

This will open the “New project” pop-up window, where you will enter all the project details.
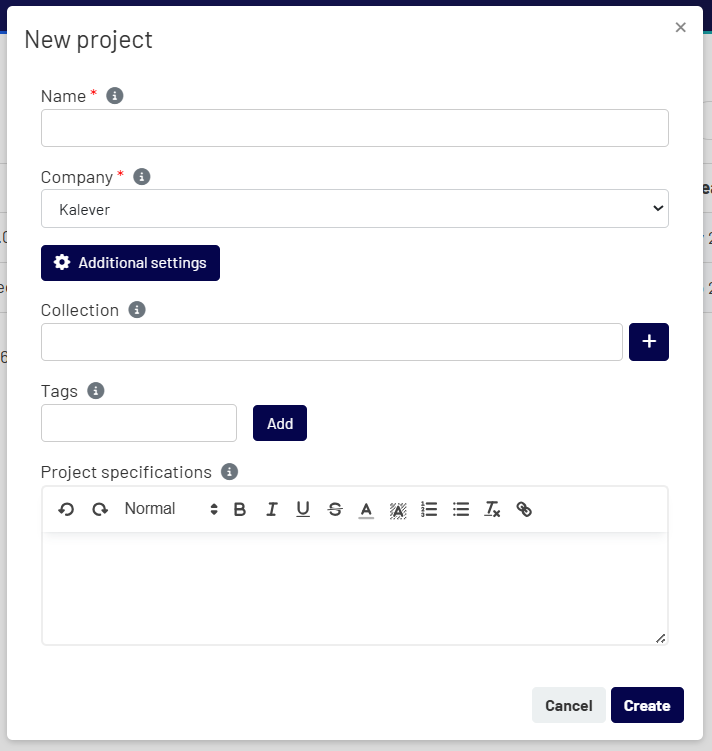
Step 2: Fill in the Project Details #

In the window, you will need to provide the following information:

  • Name (Required): Enter a clear and descriptive name for your project.
  • Company (Required): Select the company the project will be created under from the drop-down menu.

Step 3: Use Additional Settings (Optional) #

Click the Additional settings button to reveal more options for organizing your project:

  • Collection: You can group this project with others by assigning it to a collection. Either type to search for an existing collection or click the + button to create a new one.
  • Tags: Add descriptive tags to your project. This makes it easier to search for and filter later. Simply type a tag and click the Add button.
  • Project specifications: Use this text editor to enter any detailed notes, scope, or other important information that all project members should see.

Step 4: Create Your Project #

Once you have entered all the necessary information, click the Create button at the bottom right of the window. Your new project will be created and you will be taken to its Project Dashboard.

Your Kalever Dashboard: An OverviewManaging Notifications, Members, and Project Settings
Table of Contents
  • Step 1: Open the New Project Window
  • Step 2: Fill in the Project Details
  • Step 3: Use Additional Settings (Optional)
  • Step 4: Create Your Project

Share This Article :

  • Facebook
  • X
  • LinkedIn
  • Pinterest

Was it helpful ?

  • Happy
  • Normal
  • Sad
Contact form
Contact form
Linkedin

Copyright © 2025 Kalever | Powered by Kalever